Tuesday, September 11, 2012

Managing Alerts

I make this mistake every. single. time.  Whenever I try to manage alerts on a list or library, I always do the following:  I navigate to the list, click List on the ribbon under List Tools, click Alert Me, and Manage My Alerts.  This of course will only show me *my* alerts, whether logged in as a user or as an administrator.  What I really want to do is administer alerts.

What I should be doing to administer lists is the following:

Log in as a site owner.

Navigate to the site where the List that you want to modify exists.

Click Site Actions –> Site Settings.

Under the heading for Site Administration, click on User Alerts.

site_admin

Here you can select a specific user, see all the alerts that they have set, and for what list.  Really, the only option you have is to delete a user’s alerts for a list. 

alerts

Tuesday, August 21, 2012

Image Locations and Relative Paths

I add or update custom images so infrequently on a SharePoint server that I always end up endlessly digging around the hard drive until I find the right location.  So to save some time and effort, I thought I would just put it here.

The location on the drive of the SharePoint server that is running the web front end is at:

C:\Program Files\Common Files\Microsoft Shared\Web Server Extensions\14\TEMPLATE\IMAGES

Now, you may have SharePoint installed on a different drive, so the drive letter may change, but this will point you in the right direction.

Note: the above example is for SharePoint 2010, for SharePoint 2007 substitute 12 for 14.

And when you are referencing your images from a SharePoint site, the relative path to this folder is:

/_layouts/images/image_file.png

Don’t forget the “/” before “_layouts”.

So for example, when you add a custom logo or your corporate logo to your SharePoint site, you would copy the image to the drive at C:\Program Files\Common Files\Microsoft Shared\Web Server Extensions\14\TEMPLATE\IMAGES and then reference the image from Site Settings.

Log into your SharePoint site. From the Site Actions drop-down menu, select Site Settings.

site_settings

Then select Title, description, and Icon from the Look and Feel section.

look_and_feel

Lastly, provide the relative URL of the image you copied to the server earlier.

rel_location

Click Click here to test to ensure you have constructed the relative URL path correctly.

Click OK

You should now see the new image on your SharePoint site.

Wednesday, July 11, 2012

Exchange Calendar Overlays in SharePoint 2010

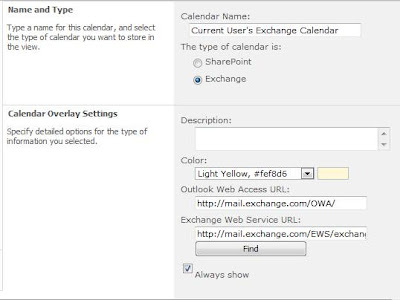
I've been doing some research into integrating SharePoint 2010 and Exchange Server 2010 calendars. While searching around for information on the topic, I found that a feature added to SharePoint 2010 was the idea of Calendar Overlays.  This is similar in concept to overlaying multiple calendars in the Outlook 2010 client, where calendars can be either side by side, or stacked one on top of the other.   At first I thought I had found the solution to my goal of integrating SharePoint and Exchange calendars into a cohesive view.  The more I experimented, the more I realized that the Calendar Overlay feature was not really about integrating SharePoint and Exchange calendars, it was more about displaying calendars.

Before using Calendar Overlays with Exchange calendars, here are a few caveats to bear in mind. 
  • SharePoint and Exchange calendars are rendered in one calendar view, they are not 'merged' or combined in any way.  The SharePoint calendar is still a list in SharePoint stored in SQL, and the Exchange calendar is still part of a mailbox in Exchange.
  • SharePoint and Exchange need to be in the same Active Directory domain for this to work as you expect it to.  SharePoint relies on the identity of the logged on user to look up calendar information from Exchange. 
  • The Exchange calendar that is displayed will be the calendar of the currently logged in user. 
There is also a little bit of ambiguity when configuring a Calendar Overlay.

  • When creating a calendar overlay, navigate SharePoint to the calendar you want to work with.   
  • When viewing the calendar, the Calendar Tools menu should appear.  Click Calendar (next to Events).
  • Select Calendar Overlays


  • When the Calendar Overlays Settings Page displays, click New Calendar
  • In the Name and Type field, provide a Calendar Name.  For the type of calendar, select Exchange.  (this post is specifically about the Exchange type of Overlay)
  • In the Calendar Overlay Settings field, provide a Description.
  • Select a Color
Here's where the important part is - 
  • For the Outlook Web Access URL - provide just the root of the OWA web application.  Even though users' Exchange mailboxes and calendars are URL addressable, anything after the /OWA/ will be ignored.  I made the incorrect assumption that I could view someone else's calendar (or group calendar) by providing the URL to that other person's mailbox. A sample URL should look similar to the following.
    http://mail.exchange.com/OWA/
  • For the Exchange Web Service URL - provide the simple base URL for EWS.  Every screenshot I have seen as an example always cuts off the end and never provides in text format, so here is an example.
    http://mail.exchange.com/EWS/exchange.asmx


I hope someone finds this helpful.

Thursday, September 23, 2010

Missing Icon Images in SharePoint 2010 Lists

After installing the 64-bit Adobe PDF iFilter on Windows Server 2008, an odd thing happened.  Some of the document icons for items in SharePoint lists disappeared.  The icons were not being referenced in the HTML.  The URL would appear as:

http://site_name/_layouts/images/

with no actual image specified.  Typically there would be a generic document icon, such as the image file icgen.gif.  Instead there was just a horrifically ugly broken image link.

I had followed the directions for installing the Adobe PDF iFilter to the letter. 

  • I added all the appropriate registry keys.
  • I copied the PDF icon image to the appropriate folder in the SharePoint hive at \14\template\images
  • I modified the docicon.xml file to include a mapping key value for the PDF image in the 14 hive folder at \14\template\xml
  • I restarted the SharePoint Foundation Search V4 service and the SharePoint Server Search 14 service. 

The searching and indexing of PDF files worked correctly, and the PDF files in my document libraries had the proper PDF icon displayed in List view.  But the icons for generic list items failed to display.

Some advice online suggested checking the permissions of the application pool associated with the SharePoint site.  I did this, but the permissions on both the app pool and the site itself were fine (and they had worked previously).

As a last resort, I changed the location of the mapping key in the docicon.xml file located at \14\template\xml

I moved the reference for:

<Mapping Key="pdf" Value="pdf.gif"/>

to the bottom of the <ByExtension> section of the XML document.   After restarting the IIS service, the PDF image icon continued to display correctly, and the icgen.gif image rendered properly as well in all of my SharePoint lists. 

In honesty I can’t explain why moving the Mapping Key to the bottom of the <ByExtension> section of the docicon.xml file worked, but if you find yourself in a similar predicament, it may help.

Friday, August 20, 2010

SharePoint Alerts to AD Security Groups Do not Work

We’ve experience the following behavior with SharePoint 2010.

In SharePoint 2007, when creating an email alert on a SharePoint list, you can specify an Active Directory Security Group as the recipient of the alerts.  (AD Distribution Groups do not work, and that is by design).

In SharePoint 2010, this capability does not seem to exist, or at least it does not work.  You can create the alert, add an AD Security Group as the recipient of the alert, and save the alert.  This will notify the group members that the alert has been created, and that they have been added.   However, when performing an action that would generate an alert (a new SharePoint List item, for example) the email alerts are never sent.

We knew that SharePoint and Exchange are communicating, as the notification of the creation of the alert gets sent out. 

The quick fix is to add users individually to the Alert.  This will work as expected for small groups but will get tedious for groups with a lot of members.  

Thursday, August 12, 2010

Monitoring Alerts in SharePoint 2010

I was experiencing some trouble with SharePoint 2010 alerts.   The SMTP relay was already configured and may would send, so we knew the infrastructure piece of this was configured correctly.  My work-group was testing various options for alert criteria from the SharePoint end user UI. 

In order to see what was actually taking place, I enabled monitoring.  This can be accomplished using Central Admin by selecting Monitoring -> Configure Diagnostic Logging -> SharePoint Foundation -> and selecting Alerts.  At the bottom of the page, select your Event Log Levels and Trace Log levels.  

Now you can start using Event Viewer and the SharePoint logs to diagnose Alert errors.

Tuesday, August 3, 2010

InoPath 2010 Forms Not Working in SharePoint 2010

I created a new InfoPath form (not very well, but serviceable).  When I tried to publish the form to a SharePoint 2010 Server, I received the following error message:


The form cannot be rendered. This may be due to a misconfiguration of the Microsoft SharePoint Server State Service. For more information, contact your server administrator.

After some research I was able to figure out that the State Service was not set up to allow InfoPath Forms to be stored or rendered within SharePoint.  I wasn't able to find a way to do this through the GUI so I resorted to the SharePoint 2010 Management Shell (PowerShell).
  •     Run the SharePoint Management Shell as an Administrator. - Start ->  All Programs -> Microsoft SharePoint 2010 Products -> SharePoint 2010 Management Shell
  • After the module(s) load and you have a prompt, type:  $serviceApp = New-SPStateServiceApplication -Name “State Service”
    The command will execute and you'll be returned to a prompt.
  •  Type: New-SPStateServiceDatabase -Name “StateServiceDatabase” -ServiceApplication $serviceApp
    This creates a state server database and service application.  You will see the name of the service database, the ID (in the form of a long string of characters) and the type presented in the PowerShell window
  • Type: New-SPStateServiceApplicationProxy -Name “State Service” -ServiceApplication $serviceApp -DefaultProxyGroup
    This creates a State Service Application Proxy
The screenshot below shows the commands and the expected output.

You should now be able to publish your InfoPath form to SharePoint.