Tuesday, September 11, 2012

Managing Alerts

I make this mistake every. single. time.  Whenever I try to manage alerts on a list or library, I always do the following:  I navigate to the list, click List on the ribbon under List Tools, click Alert Me, and Manage My Alerts.  This of course will only show me *my* alerts, whether logged in as a user or as an administrator.  What I really want to do is administer alerts.

What I should be doing to administer lists is the following:

Log in as a site owner.

Navigate to the site where the List that you want to modify exists.

Click Site Actions –> Site Settings.

Under the heading for Site Administration, click on User Alerts.

site_admin

Here you can select a specific user, see all the alerts that they have set, and for what list.  Really, the only option you have is to delete a user’s alerts for a list. 

alerts

Tuesday, August 21, 2012

Image Locations and Relative Paths

I add or update custom images so infrequently on a SharePoint server that I always end up endlessly digging around the hard drive until I find the right location.  So to save some time and effort, I thought I would just put it here.

The location on the drive of the SharePoint server that is running the web front end is at:

C:\Program Files\Common Files\Microsoft Shared\Web Server Extensions\14\TEMPLATE\IMAGES

Now, you may have SharePoint installed on a different drive, so the drive letter may change, but this will point you in the right direction.

Note: the above example is for SharePoint 2010, for SharePoint 2007 substitute 12 for 14.

And when you are referencing your images from a SharePoint site, the relative path to this folder is:

/_layouts/images/image_file.png

Don’t forget the “/” before “_layouts”.

So for example, when you add a custom logo or your corporate logo to your SharePoint site, you would copy the image to the drive at C:\Program Files\Common Files\Microsoft Shared\Web Server Extensions\14\TEMPLATE\IMAGES and then reference the image from Site Settings.

Log into your SharePoint site. From the Site Actions drop-down menu, select Site Settings.

site_settings

Then select Title, description, and Icon from the Look and Feel section.

look_and_feel

Lastly, provide the relative URL of the image you copied to the server earlier.

rel_location

Click Click here to test to ensure you have constructed the relative URL path correctly.

Click OK

You should now see the new image on your SharePoint site.

Wednesday, July 11, 2012

Exchange Calendar Overlays in SharePoint 2010

I've been doing some research into integrating SharePoint 2010 and Exchange Server 2010 calendars. While searching around for information on the topic, I found that a feature added to SharePoint 2010 was the idea of Calendar Overlays.  This is similar in concept to overlaying multiple calendars in the Outlook 2010 client, where calendars can be either side by side, or stacked one on top of the other.   At first I thought I had found the solution to my goal of integrating SharePoint and Exchange calendars into a cohesive view.  The more I experimented, the more I realized that the Calendar Overlay feature was not really about integrating SharePoint and Exchange calendars, it was more about displaying calendars.

Before using Calendar Overlays with Exchange calendars, here are a few caveats to bear in mind. 
  • SharePoint and Exchange calendars are rendered in one calendar view, they are not 'merged' or combined in any way.  The SharePoint calendar is still a list in SharePoint stored in SQL, and the Exchange calendar is still part of a mailbox in Exchange.
  • SharePoint and Exchange need to be in the same Active Directory domain for this to work as you expect it to.  SharePoint relies on the identity of the logged on user to look up calendar information from Exchange. 
  • The Exchange calendar that is displayed will be the calendar of the currently logged in user. 
There is also a little bit of ambiguity when configuring a Calendar Overlay.

  • When creating a calendar overlay, navigate SharePoint to the calendar you want to work with.   
  • When viewing the calendar, the Calendar Tools menu should appear.  Click Calendar (next to Events).
  • Select Calendar Overlays


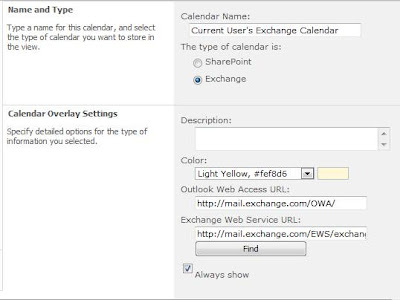
  • When the Calendar Overlays Settings Page displays, click New Calendar
  • In the Name and Type field, provide a Calendar Name.  For the type of calendar, select Exchange.  (this post is specifically about the Exchange type of Overlay)
  • In the Calendar Overlay Settings field, provide a Description.
  • Select a Color
Here's where the important part is - 
  • For the Outlook Web Access URL - provide just the root of the OWA web application.  Even though users' Exchange mailboxes and calendars are URL addressable, anything after the /OWA/ will be ignored.  I made the incorrect assumption that I could view someone else's calendar (or group calendar) by providing the URL to that other person's mailbox. A sample URL should look similar to the following.
    http://mail.exchange.com/OWA/
  • For the Exchange Web Service URL - provide the simple base URL for EWS.  Every screenshot I have seen as an example always cuts off the end and never provides in text format, so here is an example.
    http://mail.exchange.com/EWS/exchange.asmx


I hope someone finds this helpful.